REDCap tutorials
This book contains tutorials related to complex functionalities from REDCap as well as a list of new functionalities that are introduced at each major update.
Of note, if in REDCap you are not seeing one of the functionalities presented in the book, it means that you do not have the access rights. To access the desired functionality, go to  , select your username and click on
  to adjust the individual access privileges. If you are not even seeing the
  option, then you need to ask the project responsible or the Sponsor/PI to grant you access to the desired functionality.
Recording of the last REDCap Database Implementation Course [16.10.2025]
The course material can be downloaded here.
Calendar Sync
Since REDCap version 12.4.0 LTS, you now have the possibility to synch REDCap internal calendar with external applications such as Google Calendar, Outlook, Office 365, Zoho, Apple Calendar, or any application that supports iCal or ICS files.
1. Configure the Calendar
For that purpose go to  and click on
  .
.
At this point, you can either choose online or offline calendar synchronization. While online sychronization should be favoured because it will send regular updates to your external application, offline synchronization may also be handy in cases where you do not plan to make any adjustments to the REDCap calendar during the study trial.
1.1. Online Synchronization
To use the  option, simply copy the calendar URL to the clipboard:

Then, open your favourite external calendar application (here Google Calendar) and import the new calendar "from URL":
You then just need to paste the URL from the clipboard and the calendar will be successfully configured:

Of note, even though the REDCap calendar is not synchronized to your external application, this calendar feed represents a one-way feed. This means that while changes made to the calendar in REDCap will automatically show up in the external calendar application, you will not be able to modify them in the external calendar application because they will be read-only.
1.2. Offline Synchronization
If you prefer to use offline synchronization, you should follow the instructions under .
.Basically, click on
 and, in your external application (here Google Calendar), add a new calendar by "importing" a file:
Select the *.ics file you just download and import it:

2. Longitudinal Designs
If your research project includes more than one visits, under you should enable the following functionality:
  .
.A new module appears right below which lets you configure the study's events grid:

1.1. Define Events Grid
First you need to define your study events by clicking on . When you have created your events, you need to
  .
.For more information on how to setup events and assign instruments to them, have a close look at this video:
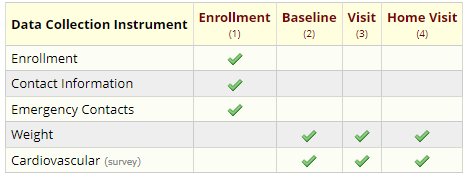
Here is a basic example of an event grid:

And the assignment of each instrument to their respective events:

1.2. Scheduling Module
Now that you have properly defined your events grid, go back to  and enable the
  .
.
A new option should now pop-up under the  sidebar:
  .
.
The scheduling module enables you to plan all the experimental sessions for a new or existing participants:

 and validate the request by pressing on
  your participant's schedule will be added to the REDCap Calendar.
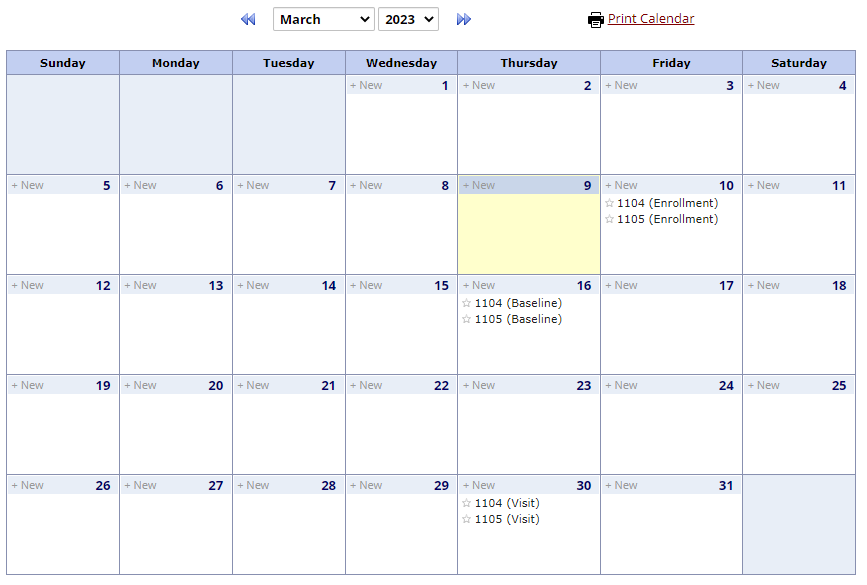
If you now go back to the
 , you will see that it's been automatically populated with the dates of your participants' sessions (here part. number 1104 and 1105), based on the events grid you defined earlier:
